Mount the ISO image file
Download the SEM Upgrade ISO image file from the SolarWinds Customer Portal. When you are finished, mount the image on Microsoft Hyper-V or VMware vSphere.
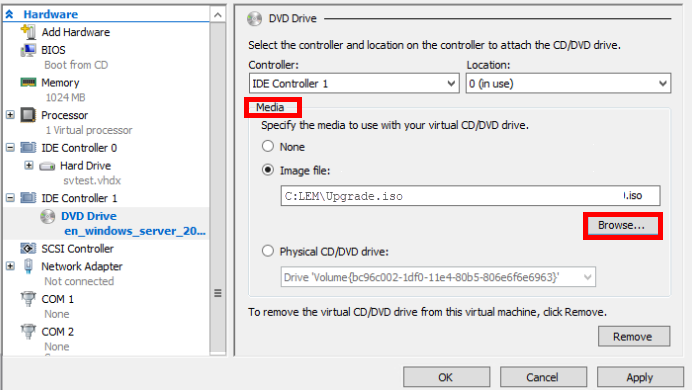
Mount the image on Microsoft Hyper-V
See the Microsoft Hyper-V documentation for additional information.
- Right-click the virtual machine and select Settings.
- In the left pane, select the DVD drive.

- In the Media pane, click Browse, and then select the ISO image.
- Click Apply, and then OK.
Unmount the image
- Right-click the virtual machine and select Settings.
- In the left pane, select the DVD drive.
-
Under Media select None.

-
Click Apply.
When you reopen Settings and DVD drive, the image file no longer displays in the window.
Mount the image on VMware vSphere
See the VMware vSphere documentation for additional information.
- Start the VMware vSphere Client.
- Log in with administrator privileges.
- In the left navigation pane, right-click the VM and select Edit Settings.
- In the Virtual Machine Properties window, click CD/DVD Drive 1 and select your ISO file.
- In the Device Type section, select Client Device, and then click OK to save the changes.
-
Start the VM before you mount the ISO.
Right-click the VM and select Power > Power On.
- In the top menu, click the CD-ROM icon, and then select CD/DVD Drive 1 > Connect to ISO image on the local disk.
